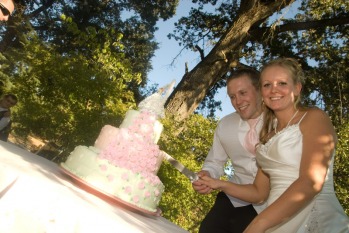
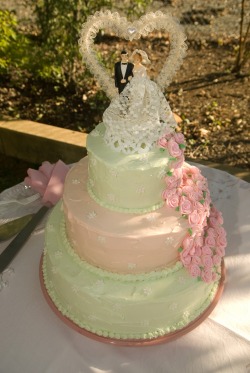
Fabulous Wedding Cake...
Here's to the wedding cake that I never thought possible. I knew I wanted to make my wedding cake from the get go. However, I had no idea how. I never dreamed that it would turn out this beautiful. I hand made each and every flower, baked all eight layers of cake and made every batch of frosting. It was time consuming, but ridiculously rewarding. And at my wedding I was in the least bit paranoid. I told everyone that if anything happened to my cake I would strangle them. I had so much invested that it was very dear to me. So, give it a try make your own cake. It's really a snap, and for around $80 bucks for over 80 people, why not?
Where to begin
Start off by discovering the kind of cake you want. The size, shape, height, design, frosting, flavors, colors, decorations are all very important. Purchase cake magazines, cake books, or better yet try your local librarys wedding magazine/book selection and borrow them for free. Every book, and magazine, article, has good tips and ideas about how to bake or decorate a cake, even if it isn't for a wedding cake they are still great ideas. Cake shows such as Ace of Cakes and Cake Boss are great for getting tips. Once you have a firm grasp on what you want your cake to look like, go out and purchase your material. Micheals and Joannes have a really great selection, but you can also try online, get your Wilton products at wilton.com or try buying (either new or used) from ebay. You will need 3 sized cake pans, you can do incriments of two or four (12,10,8 or a 12,8,4 as an example). Also buy the tools you will need for your specifications e.g. if using fondont frosting you will need different items then if you are using buttercream. Once you have all your goods practice on birthday/anniversary/ or any party cakes before the big day.
Putting together your cake

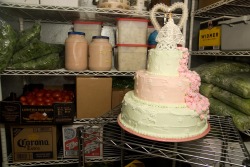
About 3 days before your wedding you are going to start your cake, you are going to bake the cake and not frost it until the day before. So if you are getting married on a Saturday, bake it Wednesday and frost it Friday. You will need to bake each layer size of cake twice for a total of 8 cakes, 2 of each size, unless you get deep dish cake pans. Two inch cake pans are more common though and baking each layer two seperate times makes frosting in between easier as it eliminate having to cut the cake in half. Start by making all your cake batter, grease and flour your cake pans, you can bake all three rounds (or whatever your desired shape) together just for different amounts of time (the smaller cakes will take less time to cook). Follow cake recipe directions for temperature and baking time .An easy, faster alternative to homemaking cake batter that guarantees you have a delicious cake is to use box cakes. Once you are all set up follow the cake pan directions for the amount of cake batter per pan and go ahead and measure adding half a cup of batter to each pan ( for luck) a little less in the smallest size. Stick the pans in the oven and set the timer(s). While you are waiting for the cakes to bake, go ahead and make your filling, here you have a lot of options:buttercream, whipped cream, raspberry, strawberry,blackberry, lemon, chocolate, mocha, or jam fillings (the list could go on forever). You can find great recipes at easy-cake-ideas.com, grouprecipes.com, or wilton.com. Once your cakes come out remove from pans and cool, refill the pans one more time and cook them again. After your cakes are done cooling cut the tops off if necessary so that they are flat. Place them on appropriate sized cake circles, and layer on the filling, than go ahead and place the second half of cake on top (making sure its top is flat as well). Remember you are not frosting your cake for a few days, so wrap them and leave them unstacked in the refridgerater. Once you are ready to frost make the frosting of your choice and dye it the colors you choose. There are wonderful dyes that are specifically for frosting do not use food coloring. Buttercream is very easy to use and there are products you can purchase to keep it pure white, otherwise it will be a slightly yellow/brown color and you will have to dye it. Fondant, royal icing, and marzipan are also commom easy to use choices. Once frosting is made and dyed take out your cakes, and frost each layer seperately, dowel the cakes but do not stack until the day of assembly. Dowel the bottom cake with four to eight dowels(depending on cake size and shape) and the middle layer with four to six (size and shape considered), you will also use one long dowel all the way through the center of the cake from middle layer to the bottom for shear strenghth (through the cake circles). There is a great website with all your baking needs at baking911.com. Note- dowels are wooden or plastic rods that support the weight of the upper level cakes, the cake on it own would collapse under the pressure, so make sure to dowel your cake.
Assembling your cake
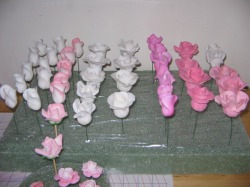
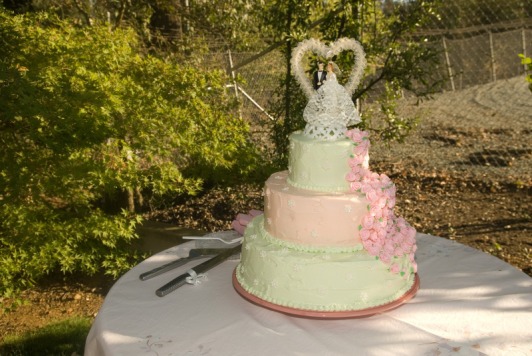
Once you have concluded all these steps and the time is right assemble your cake. It is pretty simple from this point out. Put the largest bottom layer of cake on your choice cake plate. Stack your already frosted and doweled layers, and run your long dowel down the center of the middle and bottom layers. (Note- you may have to sharpen the dowel to be able to puncture through the cake circle). Use a decorating bag to conseal the bases of each layer. You can also pipe on flowers, polka dots, swirls or any decoration you want. Also making fondant or royal icing flowers is something most everyone can do. Make or purchase fondant or royal icing start by seperating a golf ball sized piece. Roll it into a ball with your hands (if it is too sticky use confectioners sugar in your hands), get a cutting board or smooth surface and powder it with confectioners sugar roll out the ball with a rolling pin to 1/8 inch or less. The thinner the better, cut out small rounds or ovals with a cookie cutter generally about the size of a quarter. Make a small center and start wrapping the quarter sized cut outs around the center. You will use about 3-5 cut out petals for each flower. You can use water if they start to get dry (Note- make sure to not roll too large of a piece as it does get hard). The softer the frosting the easier the flowers. You can also dye the fondant any color you want, once again don't use food coloring, use icing dye/colors. Let flowers dry on base or stick on a toothpick and place in foam or the like. Place flowers on cake once it is all assembled and piped. Try a few practice flowers, but don't be intimidated, these are really fun and easy, just a little time consuming.
the result